Playing the Game
Boosters Controls Creating Battles Crystals Daily Missions Garage Gold Boxes Maps Micro Upgrades Mines Ranks Structure Premium Account Turrets Firebird Freeze Hammer Isida Railgun Ricochet Shaft Smokey Thunder Twins Vulcan Hulls Dictator Hornet Hunter Mammoth Titan Viking Wasp Game Modes Catch the Flag Control Points Death Match Team Death Match Parkour Pro Battles Social Friends Chat Clans |
Tanki Online - Maps - Monte CarloMonte Carlo is a tricky map to play on and is most definitely not suited to everyone, indeed there may be a hardcore of players on Tanki that love this map (myself included) but many people take one look and never return. Monte Carlo is Railgun, Vulcan and Shaft dominated. They are generally used for defense but in the case of Railgun, often used offensively too. Other turrets can play this map but may not score as well as the other three, although I have seen Thunder and Ricochet used with light hulls to get effect at times, although they can destroyed quite easily by a strong shaft and Railgun turret.
Those using Firebird, Freeze, Isida, Hammer and Twins should use a small hull that is fast to attack the enemy base on Catch the flag battles. Control Points and Team Death Match modes are also quite difficult, especially when there are good numbers of players taking part. The 'big three' turrets mentioned above still get a lot of action and rule the roost to a certain extent. Death Match battles are probably best played with the smaller turrets though Railgun, Ricochet and Thunder should score well here. 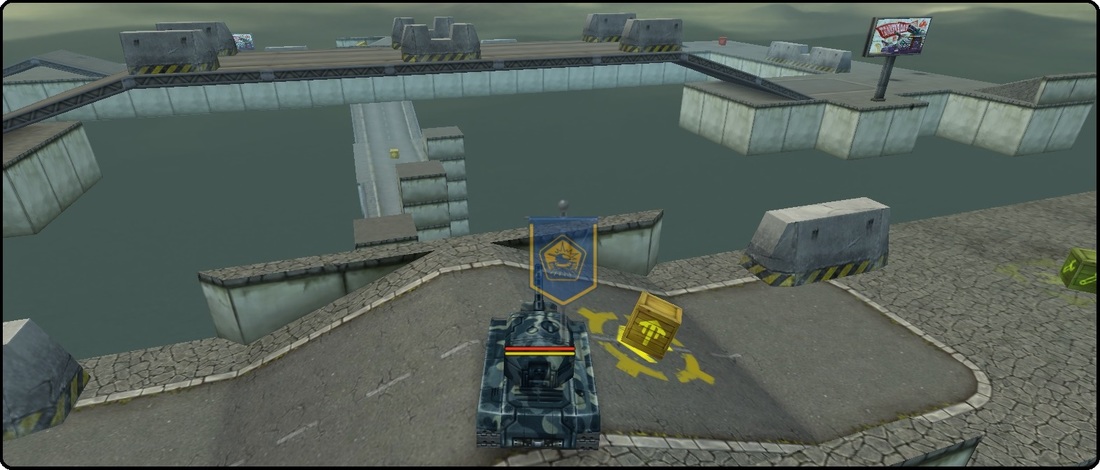
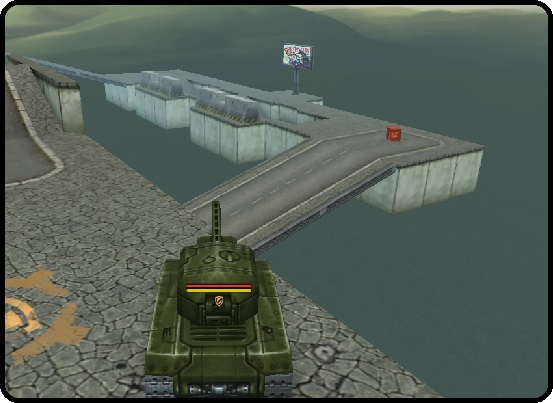
Monte Carlo is basically a series of roads that go up and down, round and round but it is not an especially large map in terms of actual navigable routes. There are two main areas where the flags are positioned, a central elevated section of road and one lower level road behind each base (Pic 1), which are connected by a long road at an even lower level. There are two long routes to attack an enemy flag and two much shorter routes, but not all players can take the short routes. Next to each flag is an up-ramp and a down-ramp which are separated by a gap in the road (Pic 2) and you need speed to get over this gap successfully. Wasp and Hornet hulls are recommended, and even these often need a Speed Boost to make the jump.
There are five Control Points on the Monte Carlo map. Each flag position doubles up as a control point, there is another in the centre of the map on the raised road section, and two more under the 'main' roads, on the lowest section. Lining the three 'main' roads are small section of wall to hind behind but be aware that these do not provide much cover at all and it is difficult to hide from the Shaft lazer beam. This map is not for those who don't getting their tank destroyed very much. Monte Carlo is available to players who hold the rank of First Sergeant and higher in the Ranks Structure.
Booster Drop Zones on the Monte Carlo MapBelow is the plan of the Monte Carlo map showing all the booster drop locations. Whoever designed this map had a flag attacking mind as the Double Damage and Speed boosters are incredible well placed to launch an attack on the enemy base. Both ramps adjacent to the flags have a nearby Speed Boost to give you enough time and speed to jump over the gap, grab the flag, and jump back over and back to base. Two Double Damage boxes are near these Speed Booster too, to give an edge over the opposition defence, and one that will be needed.
The Double Armour boosters and Repair Kits are positioned in horribly vulnerable locations, where the likes of Shaft, Railgun and Vulcan can pick you off with some ease.

|